How to Navigate
You can navigate (move your view) in two dimensions in the Map. To pan (move the map), do one of the following:
- Click and drag the map
- Additionally, you can zoom in or out by moving the cursor over a location and using the mouse scroll button to zoom in or out on that location. To centre and zoom in on a location, double click the location.
- If you zoom too much into a sea area you might loose sight of the map, simply reload your page (press F5) to return to the initial view.
Layers Menu
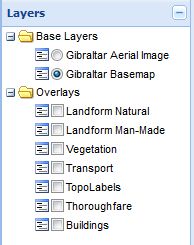
The Layers menu provides an easy interface to select the different map layers available on the map viewer. Tick a layer’s check box to display that layer.
Using the Navigation Controls
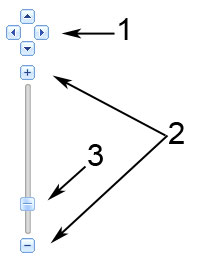 The navigation controls you see on the map viewer are shown on the left. Navigation controls include:
1. Arrows - Click the appropriate arrow buttons to move the view north, south, east or west.
2. Zoom - Click + to zoom in on the centre of the map. Click - to zoom out.
3. Zoom slider - Drag the zoom slider up or down to zoom in or out incrementally.
Using the Menu Bar Buttons
The Menu bar includes various buttons which activate different mapping tools when clicked.
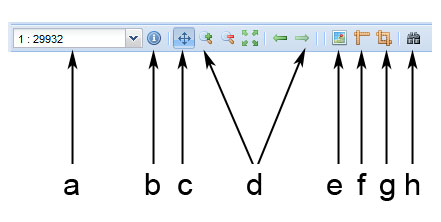
a) Zoom Amount – Select an entry from this down box to move quickly between zoom levels.
b) Feature information - Click on this button then on different areas of the map to obtain further information on a particular feature.
c) Pan / Move map – Click this button to move or pan the map.
d) Zoom controls – These buttons provide various zoom tools.
e) Find location by entering coordinates – Click this button to enter coordinates and go to this location on the map.
f) Measure length – This button provides a line tool which can be used to measure distances on the map. Click once on the map to start drawing, click to change direction of the line then double click the map to end the line.
g) Measure area – This button provides a shape tool which can be used to measure an area on the map. Click once on the map to start drawing, click to add corners then double click the map to end the line.
h) Search map – This button provides allow you to enter plain text to locate a particular feature on the map.
Legends
 The Legends area displays available legends with descriptions for each map layer. Legends appear automatically when a particular layer is displayed.
Editing Tools
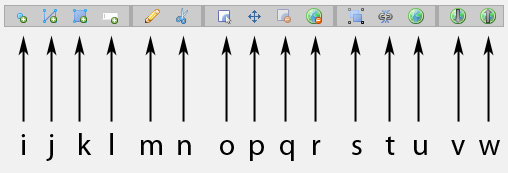
i) Draw point - tool that draws points on the map.
j) Draw path - tool that draws lines on the map.
k) Draw polygon - tool thats draws polygons on the map.
l) Draw text label - tool that adds labels on the map.
m) Modify geometry - this tool allows you to edit/modify an existing polygon drawn on the map.
n) Draw hole - this tools will help create a hole in an existing polygon drawn on the map.
o) Select geometry - tool used to select polygons drawn on the map.
p) Drag geometry - tool used to move polygons drawn on the map.
q) Delete selected geometry - this tool deletes the selected geometry item.
r) Delete all geometry - this tool will deletes all geometry items.
s) CAD tools - options to provide guides when drawing using the draw tools.
t) Snapping settings - allows snapping options to be set to draw tools.
u) Navigation - exits tools to allow map navigation.
v) Download geometries - use this tool to save drawn geometries to a file on your PC.
w) Upload geometries - use this tool to load drawn geometries from a file on your PC.